© www.knowplace.org
AMD K6-III
AMD K6-III processors don't seem to overclock nearly as well as the Celeron processors. Still, adding 50-100MHz is still better than nothing. The particular K6-3 that is was used is a 400AFR9944EPGW. The 400 denotes the rated CPU speed. AFR denotes a 321-pin CPGA 2.2V chip rated to operate between 0 and 70 degrees Celsius. The 9944 denotes 1999, week 44. CPUID reports this as a family 5, model 9, stepping 1 CPU.
For a full explanation of AMD K6-III processor markings refer to this page.
For a complete power dissipation of AMD K6-III processors see this page.
For an official AMD data sheet on K6-III refer to this PDF document.
K6-III processors are NOT multiplier locked, so if you cannot overclock the bus (FSB), you can manipulate the multipliers. The valid multipliers are 2.5x to 6.0x in 0.5 steps. The original 1.5x and 2x multipliers of Pentium processors are treated as 3.5x and 6.0x respectively. You can actually use this CPU with a variety of bus speeds. You DO NOT need a motherboard that supports the 100MHz bus speed or a special version of a K6-3 66MHz chip. There are no separate versions of the K6-3 processors ! For example, the K6-3 400 is officially specified to run at 6.0x66MHz or 4.0x100MHz.
My spare system was an Asus P55T2P4 w/ a Pentium 200MMX overclocked at 262MHz. When the price for a K6-3 CPU dropped below $80, I decided to upgrade. I have never bought a CPUs over $100. The highest working bus speed that the P55T2P4 can supply is 83MHz. Therefore, the highest theoretical speed is 500MHz on my P55T2P4. It's currently running rock solid at 450MHz @ 2.2V with no special cooling. It will actually POST at 500MHz, but my motherboard doesn't seem to like the 83MHz bus speed. I tried running 83x3.5 (291) with the same result.
Here is how I got the K6-3 400 to reliably run at 450MHz (6.0x75MHz) on my system. When I initially tried to overclock the chip to 450MHz, it was unstable at the rated 2.2V. The first trick that I tried was running it at 2.3 or 2.4V. Both setups appeared to be stable. Linux would boot. I could compile the kernel without signal 11 errors. However, after running SETI@home i386 client for a couple of hours, it would produce a segmentation fault (basically the same thing as a signal 11 error). This was obviously unacceptable. I didn't want to try a higher voltage.
The next obvious thing to do is to improve the cooling. Since this is a budget setup, I didn't want to buy any new equipment such as a bigger heatsink or peltier cooler. Besides, I don't really consider peltier cooling to be a good solution. You might as well buy a faster CPU. I had read somewhere that people were reporting higher overclocking success after prying the metal plate off the CPU and attaching the heatsink directly to the core. Since it wouldn't cost me anything but time, this is what I decided to try.
WARNING: This can easily destroy your CPU if you're not careful, and can potentially happen even if you are careful! Do not try this unless you're willing to risk destroying your CPU !
If your system is already stable, you should probably leave well enough alone.
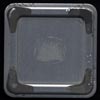 As you can see from the inside of the metal plate, it is attached to the K6-3 at the four corners and the core by glue. |
|
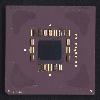 This is the bare CPU underneath. It looks surprisingly like a PIII FC-PGA. |
UPDATE: After burning-in the K6-3 400 running the SETI@home client for several days, it is now running 450MHz @ 2.2V stable with just the heatsink (no fan).